How to Level a Concrete Floor
Concrete floors can be found in a wide range of commercial and industrial environments, and they’re often favoured due to the durability and robustness they offer.
They’re specifically common in areas where heavy footfall is commonplace, as they provide a solid surface that can withstand constant use. In particular, concrete floors can be found in:
- Warehouses
- Factories
- Supermarkets
- Garages
- Airports
- Schools
- Restaurants
- And more
Another reason why concrete floors are popular is because they offer a level and even surface, but there may be some occasions where you need to level the floor yourself.
If you find yourself needing to level a concrete floor, it’s important to understand how to properly do so to achieve the desired result and not damage the surface. We’ll answer the question ‘how to level a concrete floor?’ by explaining how anyone can carry out the task.
Read on to find out more.

Benefits of a concrete floor
A concrete floor is a common structural element in a whole host of modern buildings. While particularly used in commercial and industrial properties, they can sometimes also be found in domestic properties.
Concrete floors also offer several benefits, making them a popular choice in various settings. Some of the key advantages you can expect include:
- Durability – Concrete floors are extremely durable and can withstand heavy foot traffic, machinery, vehicles and equipment without wearing down quickly. They are also resistant to scratches, stains and impacts, making them suitable for high-traffic areas like warehouses, garages and industrial facilities.
- Low maintenance – Once properly sealed and installed, concrete floors require minimal maintenance. Regular sweeping and occasional moping are usually sufficient to keep them clean. They do not require special cleaning agents or treatments, which can save time and money on maintenance costs.
- Longevity – With proper care, concrete floors can last for many decades. This makes them a cost-effective flooring option in the long run as, unlike other flooring materials that might need replacing every few years, concrete floors can maintain their appearance and functionality for many years to come.
- Versatility – Concrete floors can be customised to suit various design preferences and functional requirements. They can be polished, stained, stamped or textured to create different looks and finishes. This versatility allows concrete floors to be used in a wide range of settings, from residential homes to vast commercial spaces.
- Energy efficiency – As well as their strength, another functional benefit of concrete floors is that they have excellent thermal properties. This helps them regulate indoor temperatures and reduce energy consumption. They absorb heat during the day and release it slowly at night, helping to maintain comfortable indoor temperatures while reducing heating and cooling costs.
- Sustainability – Concrete is one of the most environmentally friendly building materials around. This is because it is made from natural materials like limestone, water and aggregates. Additionally, concrete floors can be designed to enhance energy efficiency by incorporating features such as radiant heating systems or using recycled materials in their construction.
Overall, concrete floors offer a combination of durability, low maintenance, versatility and sustainability, making them practical and attractive flooring options for a wide range of applications.
How do I check my floor’s level?
Having a level floor is extremely important. If your floor is unlevel, the risk of injury is increased as slips and falls are more common.
While a floor might look level to the naked eye, this is not always the case so it’s always worth checking that the floor is level to determine whether you need to work on it.
To check the floor is level, you should follow the steps below:
Use a spirit level
The main tool you will need to ascertain whether or not your floor is level is a spirit level. You can easily get one of these from your local DIY store or by ordering online. Place the spirit level on the floor and see where the bubble moves. If the bubble sits in the centre of the device, it means the floor is level and you will not need to take any action. However, if the bubble moves to one side, it means the floor is uneven.
Use chalk to mark the uneven areas.
Lift the spirit level
Lift one end of the spirit level until you see that the bubble in the device has centered. Then, use a tape measure to work out how out the uneven floor is and how much you will need to amend it. Make a note of this as you’ll need the information later on.
Repeat the steps
Once you’ve done this process on one area of the concrete floor, you should repeat the steps across the floor. This will give you a thorough and comprehensive look at the floor and areas that need to be addressed.
Now you’ve established the floor is not completely level, you will want to know how to level an uneven floor.
In the section below, we’ll explain how to do exactly that.
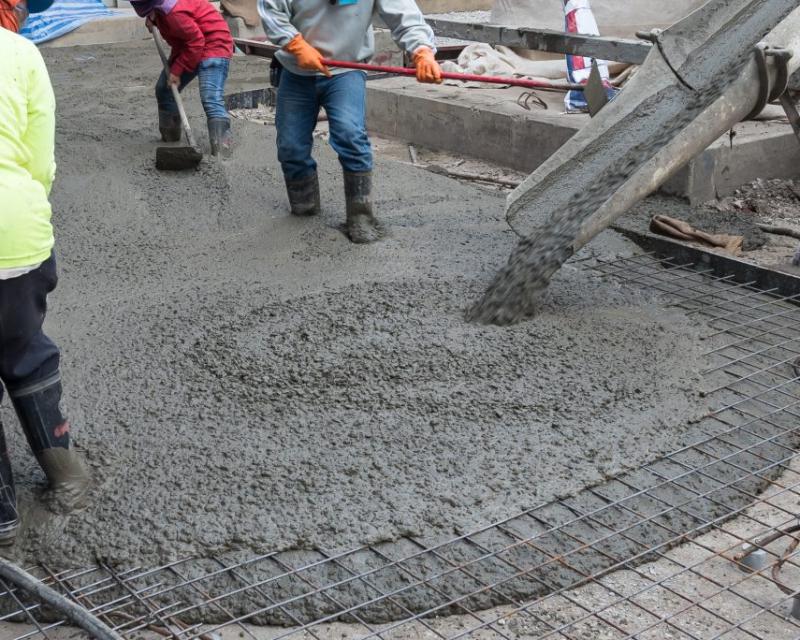
How to level a concrete floor
If your concrete floor is uneven, follow the handy guide below and you’ll be able to rectify the problem and create a level surface that better performs in the environment you need it.
Prepare and clean the area
Before you start, you should properly clean and prepare the area you’re going to be working on. This includes removing any furniture, Brushing, vacuuming or sweeping away any dirt or debris on the floor.
Then, you should conduct a moisture test. This test will let you know whether or not a moisture barrier is required to protect the floor. A moisture test involves placing a dish of calcium chloride under a glass dome. You should then leave it for up to three days and measure how much of the moisture has been lost. If the calcium chloride tablet weighs three pounds or more after the test, it means it has failed and a moisture barrier will likely be required.
Repair minor damage
If you spot any minor damage, such as cracks or holes, on the floor, these should be repaired before you proceed. To do this, use a filler and insert it into the various gaps. Once the gaps have been filled, you can move on to the next step but make sure you leave enough time for the filler to fully dry.
Mark uneven flooring spots
Take some time to observe your floor, and make a note of any obvious uneven areas. This could include dips or bumps, and while you might not be able to notice everything, there may be some clear examples which you can mark out with chalk.
Use the method we outlined above to thoroughly check your floor’s evenness with a spirit level.
Grind down high spots
If there are some areas of the concrete floor that are particularly high, use a concrete grinder to grind them down to the appropriate level. You can purchase these from local DIY stores, or rent them if you don’t want your own.
Once you’re finished with the grinder, make sure to sweep up the dust that has been left over.
Apply primer to the floor
Purchase a concrete leveller primer and apply it across your floor with a broom or roller. When doing this, make sure to apply some pressure to make sure the primer is properly being worked into the floor. You should make sure the primer is smooth and there are no puddles. It might also be worth applying a second coat in the opposite direction to make sure you haven’t missed any areas.
Give the primer time to dry
Once the primer has been applied, give it some time to dry. Drying times can vary significantly between three hours up to an entire day and will depend on the specific type of primer you have used.
Mix and spread the self-levelling compounds
Now, it’s time to use the self-levelling compound that will make your floor even. Use a bucket and pour in the compound followed by some water. Use the packet’s instructions for guidance.
Mix it thoroughly, using a drill-mounted mixing paddle. This will ensure an even consistency. The batch will only be usable for around 30 minutes after it has been mixed so it’s important not to delay the pouring process.
Using a long-handled squeegee, pour the mix onto the floor and spread it evenly ensuring every area is covered.
Allow it to dry
Before you use the floor or put back your furniture, give the mix time to dry.
Again, this can vary significantly between four to 24 hours, so check the instructions to be sure.
How to level a sloping concrete floor
Sloped floors are pretty common in the UK, especially in older properties. However, they can be a hazard, causing people to trip or fall.
To level a sloping floor, you first need to control the moisture that is near the foundations. To do this, you might need to install new drainage systems and gutters. If this does not yield any results, you will likely have to install new floor joists and support posts.
Another solution is to use plywood. This is often the most cost-effective option.